
For many older adults, persistent shoulder discomfort stems from arthritis or complex rotator cuff damage. When non-surgical treatments no longer provide adequate relief, shoulder replacement surgery offers a potential path toward restoring function and eliminating pain. However, the prospect of surgery and the subsequent recovery period can feel daunting. Understanding the journey of shoulder replacement surgery recovery in elderly patients supports a successful outcome. In this post, we’ll review what to expect during the recovery process.
Key Takeaways for a Successful Recovery
- Recovery often begins before the surgery even takes place. Steps may include pre-habilitation exercises and preparing your home environment to prevent falls and simplify daily living.
- Modern pain protocols aim to keep you comfortable. You should work closely with your surgical team to find a pain management plan that suits your individual needs.
- Having dedicated family, friends, or professional caregivers in place is helpful, especially during the first few weeks when your mobility is limited.
Understanding the Procedure: Why Age Matters
Shoulder replacement surgery, or shoulder arthroplasty, involves replacing the damaged parts of the shoulder joint with artificial components, known as prostheses. For older patients, the surgeon’s choice of procedure often depends on the health of the rotator cuff, the group of muscles and tendons that stabilize and move the shoulder.
Total Shoulder Replacement
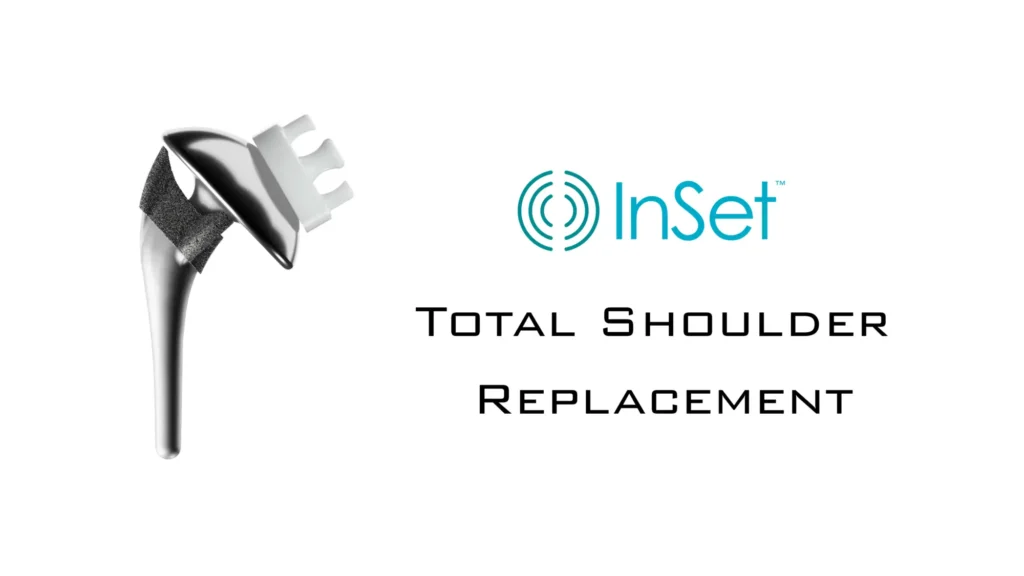
A traditional or anatomic total shoulder replacement is typically recommended when the rotator cuff is intact but the joint surfaces are damaged by shoulder arthritis. In this procedure, the surgeon replaces the “ball” (humeral head) with a metal ball and the “socket” (glenoid) with a plastic component. This procedure aims to recreate the shoulder’s natural anatomy.
[Galen to insert TSA image with SI branding]
Reverse Total Shoulder Replacement
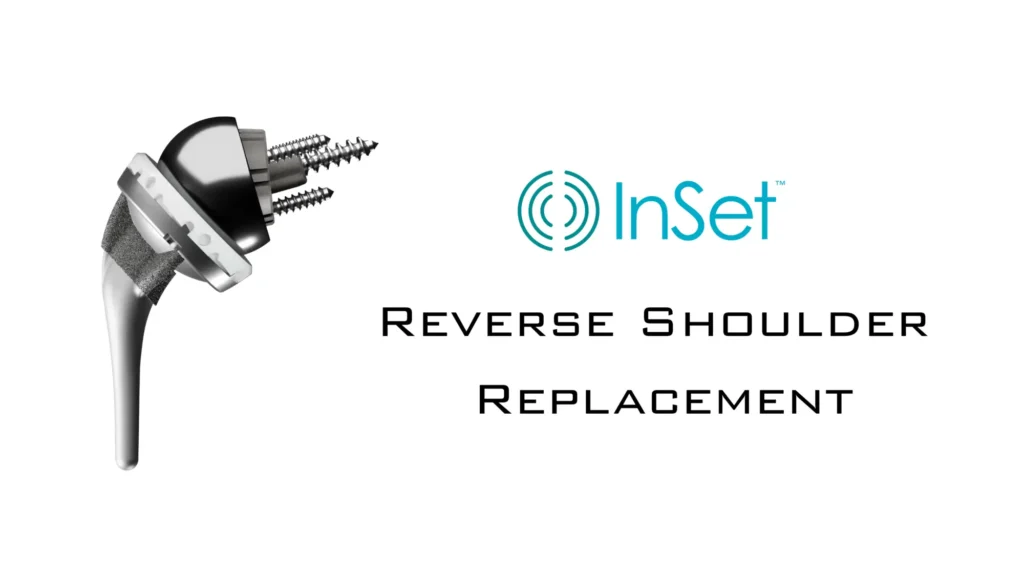
The reverse total shoulder replacement is frequently the preferred choice when a patient has both severe arthritis and a non-repairable rotator cuff tear, a condition known as cuff tear arthropathy (CTA). It can also be an effective option for treating certain complex shoulder fractures or for revising a previous shoulder replacement. In this procedure, the surgeon reverses the ball and socket: the metal ball is fixed to the shoulder blade (glenoid), and the plastic socket is placed on the upper arm bone (humerus). This reversed configuration allows the large deltoid muscle to take over the function of the damaged rotator cuff.
[Galen to insert RSA image with SI branding]
The Pre-Surgical Phase: Setting the Stage for Success
Medical Optimization and Clearance
It is common for older adults to have co-existing medical conditions, such as diabetes, hypertension, or heart disease, which may impact surgical risk and healing. Optimizing the management of these conditions before surgery may be an important step. You may need blood tests, an electrocardiogram (EKG), or other evaluations to ensure your body can safely handle the anesthesia and the stress of the procedure.
Pre-Habilitation
While you may not be able to strengthen the shoulder that is about to be replaced, you can strengthen the muscles around it and in your core. A physical therapist may guide you through exercises for your neck, elbow, wrist, and hand. Maintaining the strength and flexibility of these adjacent areas may aid your post-operative recovery. It can also be helpful to practice walking with a sling and performing daily tasks using only your non-operative arm.
Home Safety and Preparation
Fall prevention is a concern for older adults, and it becomes even more important during the recovery period when your balance and mobility may be temporarily compromised. Consider taking steps to make your home as safe and functional as possible:
- Clear Clutter: Remove throw rugs, loose cords, and any other tripping hazards from walkways.
- Install Safety Aids: Consider installing grab bars in the bathroom and a raised toilet seat. A shower chair or bench is highly recommended.
- Create a Recovery Station: Set up a comfortable, easily accessible area where you will spend most of your time. Ensure you have everything you need within reach of your non-operative arm, such as medications, remote controls, books, and a phone.
- Prepare Meals: Freeze single-serving meals before surgery. This step can eliminate the need to cook for the first few weeks, reducing strain and simplifying your recovery.
Assembling Your Support System
You will likely need assistance with many activities of daily living in the weeks following the procedure. You should arrange for a dedicated caregiver to be with you, especially during the first week after discharge. Your caregiver will generally need to help with dressing, bathing, preparing meals, and driving you to physical therapy appointments.
The Immediate Post-Operative Period
While timelines may vary between patients, the first few weeks after surgery typically focus on pain control, wound healing, and protecting the new joint.
Pain Management Strategies
Your surgical team will likely employ a multimodal approach to pain control. This may include a nerve block administered during surgery, which can provide hours or even several days of pain relief. While the nerve block is working, it is important to take any other medication as prescribed by the doctor to ensure you do not experience rebound pain when the nerve block wears off. After the nerve block wears off, you may transition to oral pain medication.
You should take your pain medication as prescribed, especially before physical therapy sessions, to ensure you can participate effectively. It is important to understand that the goal is not to eliminate all pain, but to manage it to a tolerable level that allows for rest and early movement. Communicate openly with your doctor about your pain levels.
Protecting the New Joint: The Sling
You will wake up from surgery with your arm in a sling. The sling is not just for comfort; it is a protective device. It keeps your arm in a safe position and prevents you from making sudden movements that could damage the surgical repair or dislocate the new joint.
The specific type of sling and the duration of its use will depend on the type of surgery you had. Your surgeon will provide precise instructions on when and how to remove the sling for bathing and exercises, along with when it is ready to be discontinued.
Hospital Stay and Discharge Planning
Following the procedure, your medical team will assess when you are ready to return home. Oftentimes patients go home on the day of surgery. Some patients stay in the hospital for a short period so their pain, mobility, and overall stability can be monitored. Before discharge, you’ll receive instructions on wound care, activity restrictions, medications, and when to begin physical therapy.
Early Recovery
The Role of Passive Motion
In this phase, you are generally not allowed to move your arm on your own. Instead, the physical therapist, or sometimes a continuous passive motion (CPM) machine or your other arm, moves the operated arm for you. This is called passive motion. The goal is to prevent scar tissue from forming and to maintain the mobility that the surgeon achieved during the operation.
The movements should be gentle and controlled. You will typically learn a set of home exercises, which you must perform several times a day. Consistency in this phase is key to preventing stiffness.
Managing Daily Life
During these early weeks, you may need to make modifications to your daily life.
- Dressing: Wear loose-fitting, button-down shirts or tops that are easy to put on and take off. Always dress the operated arm first and undress it last.
- Bathing: Consider taking sponge baths or using a shower chair. You must keep the incision site clean and dry until your surgeon says it is safe to get it wet. Depending on the dressing used, you may be able to shower right away but be sure to avoid direct water pressure on the incision site or scrubbing the incision site.
- Sleeping: Many patients find it most comfortable to sleep in a semi-reclined position, such as in a recliner or propped up in bed with pillows. This can help reduce swelling and keep the arm in a safe, comfortable position. Additionally, there are specific pillows made for sleeping after shoulder surgery. An example of this is the Shoulder Sleeper. This pillow is designed to conform to your body and make sleeping at night more comfortable. If you choose to use the Shoulder Sleeper, use code KOHANMD at checkout for a discount.
Mid-Recovery
Timelines vary, but usually around the six-week mark, your surgeon will likely clear you to begin the next phase of rehabilitation, which introduces active range of motion (AROM) and light strengthening.
Active Range of Motion
Active motion means you start moving your arm using your own muscles, without assistance. A physical therapist may guide you through exercises designed to activate the muscles around the shoulder. The focus shifts from simply maintaining motion to actively regaining control and coordination. You should still exercise caution and avoid lifting anything heavier than a cup of coffee. The tissues are still healing, and excessive strain could cause injury.
Beginning Light Strengthening
As your range of motion improves, you may begin light strengthening exercises, often using resistance bands or very light weights. These exercises are helpful for building the muscle power needed to perform everyday activities. The strengthening program will be progressive, meaning the intensity will gradually increase over time.
Late Recovery
Advanced Strengthening and Endurance
In this phase, your physical therapy may become more rigorous. You may start focusing on functional movements that mimic the activities you want to return to, such as reaching overhead, carrying groceries, or performing light yard work.
Returning to Activities
Your surgeon will provide specific guidelines on when you can safely return to certain activities. While every patient is different, here are some general timelines and considerations:
- Driving: The time to return to driving varies between patients. The most important factor about when patients can drive is when they feel safe operating a vehicle. Some patients are driving after only a few weeks; some choose to wait closer to 3 months. Most patients are somewhere in the middle.
- Golf/Swimming: Light, low-impact activities like putting or walking in a pool may be permitted around 3 to 4 months. More vigorous activities, such as a full golf swing or freestyle swimming, may require 6 months or more.
- Lifting Restrictions: You may have permanent lifting restrictions to protect the longevity of the implant. You should discuss these long-term restrictions with your surgeon.
Summary
The journey of shoulder replacement surgery recovery that elderly patients embark on can be demanding, requiring commitment to physical therapy and adherence to safety precautions. By understanding the differences between total and reverse shoulder replacement, preparing your body and home environment, and following your rehabilitation plan, you position yourself for the best possible outcome.
Frequently Asked Questions
How long does the entire recovery process take for an elderly patient?
The full recovery process typically takes between six months and a year or longer. Many patients regain enough function to perform daily activities comfortably within three to four months. However, strength gains and full endurance may continue to improve for up to a year.
When can I start driving again?
There are two rules before you can drive after shoulder surgery. #1 – you cannot be taking any narcotic pain medication. #2 – you have to feel safe operating a vehicle. This means you need to have regained sufficient active motion, strength, and reaction time to safely control the steering wheel and reacting to obstacles on the road. The timeline to get to this point varies from patient-to-patient but can be anywhere between 2-12 weeks.
What are the long-term restrictions after a reverse shoulder replacement?
For a reverse shoulder replacement, while there may not be formal restrictions, the more aggressive your activities, the faster the implants or components may wear out. Restricting the amount of weight you lift with the operative arm may protect the longevity of the implant and prevent loosening.